Contents:
- 7.10: Managing Equipment Operators and
Drivers in EZM Web
- 7.10.1: Entering New Equipment
Operators and Drivers
- 7.10.2: Entering Equipment Operation
and Vehicle Licenses
- 7.10.3: Recording Equipment Operation
and Vehicle Incidents
- 7.10.4: Printing All Expiring Drivers’
Licenses
7.10 Managing Equipment Operators and Drivers in EZM Web
|
|
In many instances, you will have to specify the operator
of a piece of equipment or the driver of a vehicle in EZM Web. Typically, this will be specified by means
of a drop-down menu. This drop-down
menu will consist of only the equipment operators or drivers you have already
entered into EZM Web. Here we will
explain how to enter equipment operators and drivers into EZM Web.
To get to the section of EZM Web where you enter equipment
operators and drivers, click on the Operators & Drivers option under
the Utilities and Lists drop-down menu on the left side of the screen:

7_027: Fig 7.10-1 – “Operators & Drivers” option under
“Utilities and Lists” drop-down menu
Clicking on the Operators & Drivers option will
take you to the following screen where you can enter your equipment operators
and vehicle drivers:
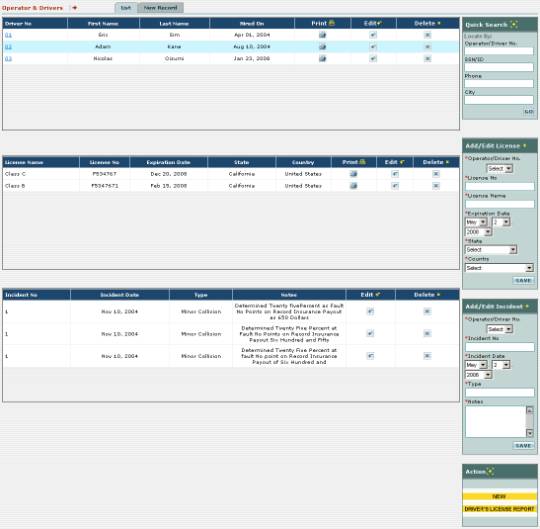
7_041: Fig 7.10-2 – Screen at which you enter equipment
operator and driver information
Near the top of this screen you’ll see the list of
equipment operators and drivers you’ve entered so far:

7_044: Fig 7.10-3 – List of equipment operators and
drivers entered so far into EZM Web
If you select an equipment operator or driver by clicking
on its number in the Driver No column, the list of licenses and
incidents for that driver or operator will display. Here you can see the list of licenses for that operator or
driver:
![]()
7_046: Fig 7.10-4 – List of equipment and/or vehicle
licenses for an equipment or vehicle operator
And here is the list of incidents:
![]()
7_047: Fig 7.10-5 – List of incidents for an equipment or
vehicle operator
We’ll explain how to perform the following actions at this
screen:
o
Enter a new equipment operator or vehicle driver
o
Enter the vehicle or equipment operation licenses
o
Keep a record of driving or equipment operation incidents
for a particular operator/driver
o
Print a list of expiring drivers’ licenses
7.10.1 Entering New Equipment Operators and Drivers
To enter a new equipment operator, first click on the New
Record tab immediately above the list of drivers:
![]()
7_042: Fig 7.10.1-1 – “New Record” tab
Clicking on the New Record tab will open up the
following form where you can enter the information for the new driver or
equipment operator:
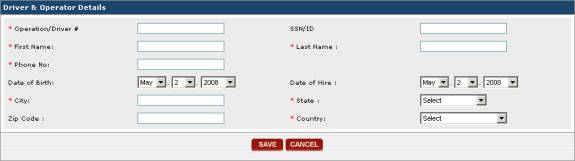
7_043: Fig 7.10.1-2 – Form where you enter a new equipment
or vehicle operator
Fields marked with a red asterisk are required fields and
must be filled in before you can save the new operator or driver. First, enter an equipment operator or driver
number into the Operator/Driver # field. This number is used to uniquely identify the operator or driver
in EZM Web, therefore no other driver or operator may have the same number. The rest of the fields are self-explanatory.
Once you have filled in all of the information for the
operator or driver, click on the SAVE button to add it to the list of
operators and drivers. If you have
changed your mind and do not want to enter the operator or driver, then click
on the CANCEL button instead.
7.10.2 Entering Equipment Operation and Vehicle Licenses
To enter equipment operation and vehicle licenses or
operators or drivers, use the Add/Edit License box on the right side of
the screen:
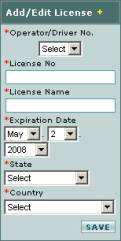
7_045: Fig 7.10.2-1 – Form where you enter a new equipment
or vehicle license
First, select the operator or driver number from the Operator/Driver
No. drop-down box to specify to whom this license belongs. Then type in the number of the license in the
License No box and the name of the license (for example, “Class C”) in
the License Name box. Select the
Expiration Date and select the State and Country in which
the license was issued. Once you have
entered all of the data for the license, then click on the SAVE button
in the lower right-hand corner of the Add/Edit License box. The license will then be added to the list
of those for the operator or driver you selected.
You can also edit existing licenses as well. In the list of licenses, locate the ![]() button corresponding with the license you want to edit under the Edit
column and click on it. The Add/Edit
License box will fill in with all of the information about that
license. Edit any of the information
and then click on the SAVE button to save your changes.
button corresponding with the license you want to edit under the Edit
column and click on it. The Add/Edit
License box will fill in with all of the information about that
license. Edit any of the information
and then click on the SAVE button to save your changes.
To delete a license, locate the license you want to delete
in the list of licenses and find the ![]() button that corresponds with that license. Clicking on that button will delete the
license.
button that corresponds with that license. Clicking on that button will delete the
license.
Clicking on the ![]() button for a license will print a report showing all of the
details for that license.
button for a license will print a report showing all of the
details for that license.
7.10.3 Recording Equipment Operation and Vehicle Incidents
To add equipment operation or vehicle incidents to the
record of an equipment or vehicle operator, use the Add/Edit Incident
box on the right side of the screen:
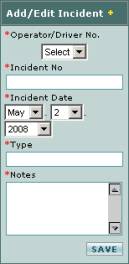
7_048: Fig 7.10.3-1 – Form where you enter a new incident
for an equipment or vehicle operator
First, select the operator or driver who was involved in
the incident you are recording from the Operator/Driver No. drop-down
box. Then choose a number which you
want to use to identify the incident and type it into the Incident No
box. Select the Incident Date,
specify what type of incident it was in the Type box, and type any
additional notes in the Notes box.
Once you have entered all of the data for the incident, then click on
the SAVE button in the lower right-hand corner of the Add/Edit
Incident box. The incident will
then be added to the list of those for the operator or driver you selected.
You can also edit existing incidents as well. In the list of incidents, locate the ![]() button corresponding with the incident you want to edit under the
Edit column and click on it. The
Add/Edit Incident box will fill in with all of the information about
that incident. Edit any of the
information and then click on the SAVE button to save your changes.
button corresponding with the incident you want to edit under the
Edit column and click on it. The
Add/Edit Incident box will fill in with all of the information about
that incident. Edit any of the
information and then click on the SAVE button to save your changes.
To delete an incident, locate the incident you want to
delete in the list of incidents and find the
![]() button that corresponds with that incident. Clicking on that button will delete the
incident.
button that corresponds with that incident. Clicking on that button will delete the
incident.
7.10.4 Printing All Expiring Drivers’ Licenses
You can also print a report that shows all of the licenses
that are to expire in a given number of days.
To use this feature, click on the yellow DRIVER’S LICENSE REPORT
button at the lower-right corner of the screen:

7_052: Fig 7.10.4-1 – “DRIVER’S LICENSE REPORT” button
After clicking on the DRIVER’S LICENSE REPORT
button, a small window will pop up.
Since this report shows you all of the licenses that are to expire in a
given number of days, you enter that number here:
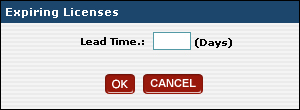
7_053: Fig 7.10.4-2 – Entering lead time
After entering the number of days, click on the OK
button to print the report, or click on the CANCEL button if you have
changed your mind and do not want to print the report.