Contents:
- 3.6: Vehicle Maintenance History
- 3.6.1: Viewing the List of Completed
Vehicle Work Orders
- 3.6.2: Viewing, Editing, Approving, and
Printing Work Orders
- 3.6.3: Printing the Vehicle Maintenance
History
- 3.6.4: Searching for Completed Work
Orders
3.6 Vehicle Maintenance History
|
|
After a vehicle maintenance work
order is closed in EZM Web, it is automatically stored in the vehicle
maintenance history. To access the
vehicle maintenance history, click on Service History under the Vehicle
Service drop-down list on the left side of the screen:
![]()
Fig 3.183 – “Service History” link
Clicking on the Service
History link will take you to the following screen, which we’ll call the
“Main Vehicle Maintenance History” screen:
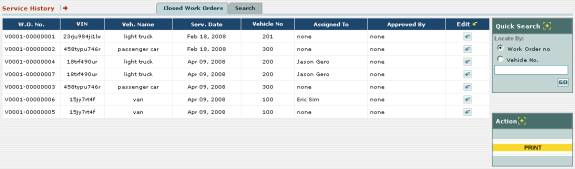
Fig 3.184 – The “Main Vehicle Maintenance History” screen
In the vehicle maintenance
history, you can do the following:
o
View a list of all completed vehicle work orders
o
View and change details about closed work orders; approve
work orders
o
Print the work order history for vehicle maintenance
o
Use the search feature to search for completed vehicle
work orders
In the following sections we
will describe how to perform each of these tasks.
3.6.1 Viewing the List of
Completed Vehicle Work Orders
At the main vehicle maintenance
history screen (see the previous section 3.6
Vehicle Maintenance History for instructions on how to reach this
screen), you’ll see the list of completed vehicle work orders:
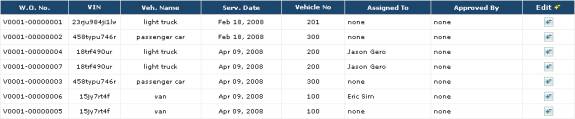
Fig 3.185 – List of completed work orders in the vehicle
maintenance history
For each completed work order in
the list, you can see the following information:
o
Its work order number: each
work order is identified by a unique work order number which is shown in the W.O.
No. column, which is the left most column in the list.
o
The VIN number of the vehicle: The VIN
number of the vehicle for which the work order was created is shown in the VIN
column.
o
The vehicle name of the vehicle: The
vehicle name of the vehicle for which the work order was created is shown in
the Veh. Name column.
o
The day on which the maintenance was completed: The day
on which the work order was closed is shown in the Serv. Date column.
o
The vehicle number of the vehicle: The
vehicle number that uniquely identifies the vehicle for which the work order
was created is shown in the Vehicle No column.
o
Whom the work order is assigned to: The
person to whom each work order is assigned to is shown in the Assigned To
column.
o
Who approved the work order: If the
work order has been approved by a supervisor, the supervisor who approved the
work order is shown in the Approved By column.
On the right side of the screen
there is a Quick Search box that enables you to search for a work order
either by its unique work order number or by the vehicle number of the vehicle
for which the work order was created:
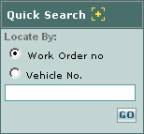
Fig 3.186 – “Quick Search” box for searching for completed
vehicle work orders
To search by work order number
or vehicle number click in one of the circles named Work Order no, and Vehicle
No. respectively. Then, depending
on what you selected, type the work order number or vehicle number into the box
immediately below, and then click on the GO button. The list of work orders will be updated to
match only those which fit your search criteria.
3.6.2 Viewing, Editing,
Approving, and Printing Work Orders
In EZM Web, you can also view
details of closed work orders, edit some details of closed work orders, approve
work orders to indicate that a supervisor has “signed-off” on them, and print
them as well. To do any of these
actions, you must first go to the main vehicle maintenance history screen (see
the previous section 3.6 Vehicle
Maintenance History for instructions on how to reach this screen). Then, in the list of work orders, locate the
work order you want to view, edit, or approve, and then locate the ![]() button in the Edit column that
corresponds with that work order. You
will be taken to the following screen:
button in the Edit column that
corresponds with that work order. You
will be taken to the following screen:
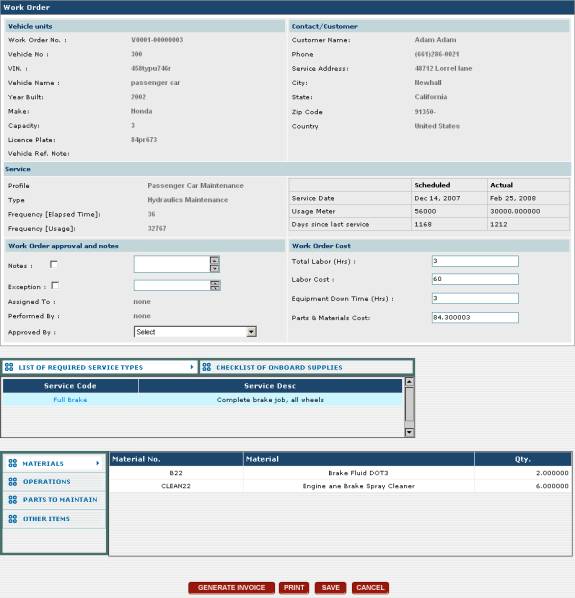
Fig 3.187 – Viewing/Editing/Approving a completed work
order in vehicle maintenance history
This screen lists all of the
details of the work order you selected.
This screen is very similar to the one described in section 3.5.2 Creating Vehicle Work Orders
where you create a new work order except that only certain details of the work
order can be changed now that the work order has been completed and saved into
the history.
However, you can edit the
following items under the Work Order approval and notes and Work
Order Cost sections:

Fig 3.188 – “Work Order approval and notes” and “Work
Order Cost” sections
In the Work Order approval
and notes section you can edit the notes and exceptions for the work order
(in the Notes and Exception field respectively), and, if you are
a supervisor, you can approve the work order by selecting yourself in the Approved
By drop-down box.
In the Work Order Cost
section you can edit the total labor hours required in the maintenance (Total
Labor (Hrs)), the total cost for the labor (Labor Cost), the length
in hours for which the vehicle had to be parked for repair (Equipment Down
Time (Hrs)), and the total cost of the materials and replacement parts used
in the maintenance (Parts & Materials Cost).
If you want to print the work
order, there are two ways to do this: you can click on the PRINT button
at the bottom of the screen, or you can use the Reports box at the right
side of the screen:
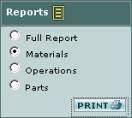
Fig 3.189 – “Reports” box for printing the work order
To print the full work order using the Reports box,
begin by clicking on the circle called Full Report to select it. Then click on the small PRINT button
in the lower right corner of the box.
After selecting your printer, the work order will print. When you select Full Report, the work
order that prints out contains all of the Materials, Operations, and Parts, and
other items included in each service in the work order. You can also use the Reports
box to print a work order that only contains the Materials, Operations, or
Parts required in each service in the work order. To do this, select one of the circles called Materials, Operations,
or Parts in the Reports box, and then click on the PRINT
button at the lower right.
Once you have made all of the
desired changes to the work order, then click on the SAVE button at the
bottom of the screen to save all your changes.
To exit from the work order without making any changes, click on the CANCEL
button instead.
3.6.3 Printing the Vehicle Maintenance History
EZM Web also lets you print out
a list of all of the completed vehicle maintenance work orders. To do this, you must first go to the main
vehicle maintenance history screen (see the previous section 3.6 Vehicle Maintenance History for
instructions on how to reach this screen).
Then, locate the yellow-colored PRINT button at the right side of
the screen:
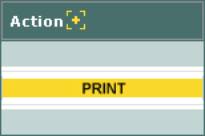
Fig 3.190 – “PRINT” button for printing the maintenance
history
After clicking on the print
button, the following report will print after you select your printer:
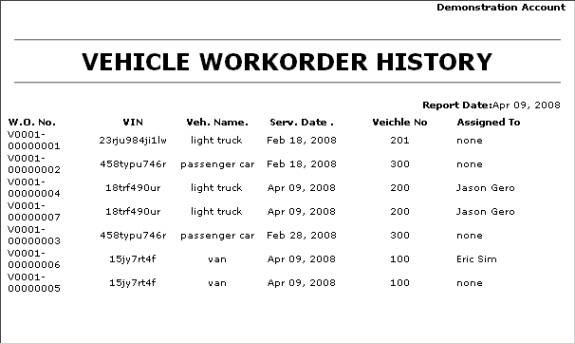
Fig 3.191 – Printout showing the vehicle maintenance
history
This report lists all of the
completed vehicle work orders in EZM Web.
3.6.4 Searching for Completed
Work Orders (Advanced Search)
In the vehicle maintenance
history in EZM Web, there is also an advanced search feature that lets you
search through the maintenance history.
To use this feature, you must first go to the main vehicle maintenance
history screen (see the previous section 3.6
Vehicle Maintenance History for instructions on how to reach this
screen). Then locate the Search
tab above the list of completed work orders.
Clicking on the search tab will take you to the following screen:
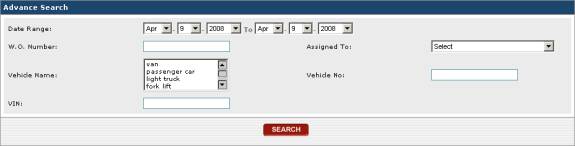
Fig 3.192 – Printout showing the vehicle maintenance
history
Here you can enter multiple
criteria to search for completed work orders, and any work orders that don’t
match the criteria that you entered will be filtered out leaving only those
which match what you entered. The
purpose of each data area on the advanced search form is as follows:
o
Date Range: Here you can select the
date range in which you want to search for work orders. Any work orders falling outside the date
range you select here will be omitted from your search results. The right set of three boxes let you select
the lower bound of the date range, while the bottom three let you select the
upper bound.
o
W.O. Number: If you want to look for
a particular work order and you know the work order number, type it here.
o
Assigned To: This drop-down box lets
you filter by the person to whom the work order was assigned.
o
Vehicle Name: This field lets you
filter by the type of vehicle or “vehicle name”. Only the type of vehicle that you enter here will be included in
the search results.
o
Vehicle No: If you want to filter
all of the work orders for only one specific vehicle and you know the vehicle
number that uniquely identifies it, then you can enter it here.
o
VIN: If you want to filter all of
the work orders for only one specific vehicle and you know the VIN number that
uniquely identifies it, then you can enter it here.
Once you have entered all of
your search criteria, then click on the SEARCH button to display the
list of work orders you are searching for.