Contents:
- 3.2: Entering, Editing, and Deleting Your Vehicles
- 3.2.1: Viewing the List of Vehicles
- 3.2.2: Entering a New Vehicle
- 3.2.3: Editing Vehicle
- 3.2.4: Deleting Vehicles
3.2 Entering, Editing, and Deleting Your Vehicles
|
|
After you have set up the vehicle service module as
described in section 3.1, you can enter your vehicles into EZM Web. To start entering your vehicles, click on Vehicles
to Service under the Vehicles Service drop-down list on the left
side of the screen:
![]()
Fig 3.103 – “Vehicles to Service” Link
After you
click on Vehicles to Service, you will be taken to the following screen,
which we’ll call the “main vehicle control screen”:
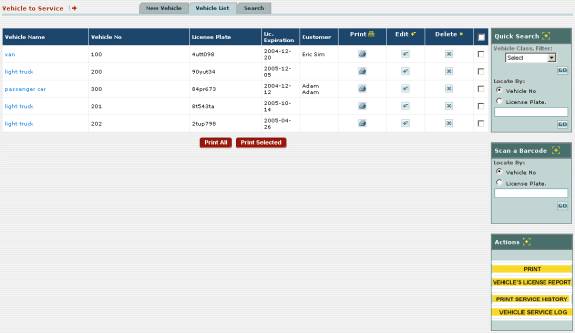
Fig 3.104 – “Main Vehicle Control Screen”
From this screen, you can accomplish the following
actions:
o
View and search a list of all of your vehicles
o
Input new vehicles into EZM Web
o
Edit vehicles that you’ve entered
o
Delete vehicles that you’ve entered
o
Record usage logs for your vehicles
o
Print a report showing all licenses set to expire
o
Print a maintenance history for a selected piece of
vehicle
o
Print a usage log for a vehicle
o
Print barcode labels for your vehicles
In addition to the above actions, we will also discuss how
to import usage logs into EZM Web via an Excel® spreadsheet.
3.2.1 Viewing the List of
Vehicles
At the
top of the main vehicle control screen (see the previous section 3.2 Entering, Editing, and Deleting Your Vehicles for instructions
on how to reach this screen) you’ll see the list of vehicles:
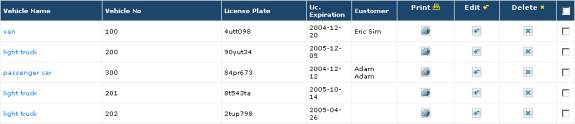
Fig 3.105 – List of Vehicles
The list of vehicles displays all of the vehicles that you
have entered into EZM Web so far. Just
by simply looking at the list of vehicles, you can glean the following
information for each piece of vehicle you’ve entered:
o
What kind of vehicle it is: the
vehicle name for each vehicle is shown in the Vehicle Name column. The vehicle name tells you what kind of
vehicle it is.
o
Its vehicle number: the vehicle
number for each vehicle is shown in the Vehicle No column. The vehicle number is an arbitrarily chosen
code that is used to uniquely identify each vehicle in EZM Web. The vehicle number for a vehicle may or may
not correspond with the internal tracking numbers your company uses to track
your vehicles.
o
Its license plate number: the
vehicle’s license plate number is shown in the License Plate column.
o
License or registration expiration date: the
expiration date for the vehicles license or registration is shown in the Lic.
Expiration column.
o
What customer it belongs to: if you
are servicing a vehicle for a customer of yours, the customer will be shown in
the Customer column.
There are also two search features on the right side of
the screen which you can use to locate vehicles. The first is the Quick Search box at the upper-right hand
corner:
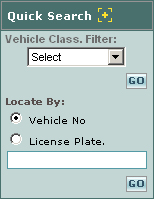
Fig 3.106 – “Quick Search” box
Using the Quick Search box, you can search for vehicles
all sharing the same classification, or you can search for a vehicle by
entering its vehicle number or its license plate number.
To search for all vehicles sharing the same
classification, first select the classification from the Vehicle Class. Filter
drop-down box. Then click on the small GO
button immediately below and to the right of the drop-down box. The vehicle list will then be updated with
only the vehicles with the classification you selected. To reset the list so that all of the vehicles
are displayed, select the “Select” option from the drop-down box and then click
on the GO button. (See section 3.1.2 Vehicle
Classifications for information on what vehicle classifications are and
how to enter them into EZM Web.)
To search for a vehicle by entering its vehicle number or
license plate number, click in one of the small circles named Vehicle No
or License Plate. respectively.
Then, depending on what you selected, type in the vehicle number or
license plate number in the box immediately below, and then click on the small GO
button immediately to the bottom right.
If you selected Vehicle No, the vehicle with the vehicle number
that you typed will be shown in the vehicle list. Similarly, if you selected License Plate., the vehicle
with the license plate number which you typed in will be shown.
You can also locate vehicles by scanning a bar-coded label
using the Scan a Barcode box on the right side of the screen:
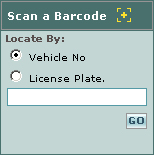
Fig 3.107 – “Scan a Barcode” box
To locate a vehicle by scanning its barcode, you first
need to select whether the barcode you are scanning contains the vehicle’s
vehicle number or its license plate number by clicking on one of the small
circles called Vehicle No or License Plate.. Once you have selected one of the two, then
place the cursor in the box immediately below by clicking in it. Then use your barcode reader to swipe the
barcode, and then click on the GO button immediately below the box. The vehicle which you scanned will now be shown
where the vehicle list usually is.
To enter a new vehicle into EZM Web, first you will need
to be at the main vehicle control screen (see section 3.2
Entering, Editing, and Deleting Your Vehicles for instructions on how
to reach this screen). Then you will
need to click on the New Vehicle tab above the list of vehicles:
![]()
Fig 3.108 – “New Vehicle” tab
After
clicking on the New Vehicle tab, you will be taken to a screen where you
enter the details about the new vehicle:
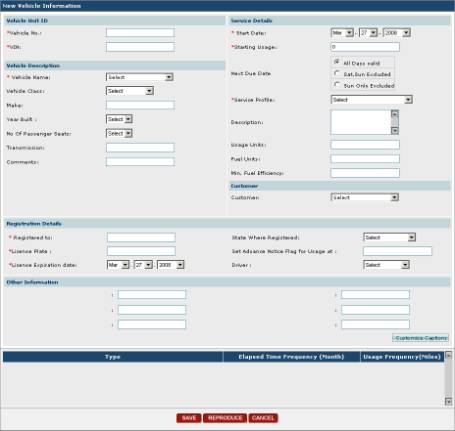
Fig 3.109 – “New Vehicle Information” screen where you
enter a new vehicle
As you
can see in Fig 3.109, there are several fields on the New Vehicle
Information screen in which you can enter data. Fields marked with a red asterisk are required fields, which
means that you cannot save the new vehicle into EZM Web until you have inputted
information into these fields.
Also notice that all of the fields are organized into the
groups Vehicle Unit ID, Vehicle Description, Service Details,
Customer, Registration Details, and Other Information. We will proceed group by group and describe
the purpose of each data field.
Vehicle Unit ID:
o
Vehicle No.: In this field you enter
a code that uniquely identifies the vehicle.
This can be either a code from your existing cataloging system that your
company uses internally or a completely new code that you’ll use in EZM Web.
o
VIN: In this field you enter the
vehicle’s VIN number.
Vehicle Description:
o
Vehicle Name: Here you select the short
description of this vehicle that describes it briefly and indicates what type
of vehicle it is. You can only select
vehicle names which have already been entered into EZM Web. (See section 3.1.1
Vehicle Names for information on how to enter new vehicle names into
EZM Web.)
o
Vehicle Class: This is where you select
the classification to which the vehicle you are entering belongs. Classifications are groups into which you
can put related vehicles for maintenance tracking purposes. Here, you can only choose classifications
which have already been entered into EZM Web.
(See section 3.1.2 Vehicle Classifications
for information on how to enter new vehicle classifications into EZM Web.)
o
Make: In this field you can enter
the make of the vehicle which you are entering.
o
Year Built: Here you select the year
in which the vehicle was built.
o
No of Passenger Seats: Here
you select the number of passenger seats in the vehicle.
o
Transmission: Here you enter the type
of transmission in the vehicle
o
Comments: Here you can enter any
additional information about the vehicle that is useful or important to note.
Service Details:
o
Start Date: This is where you enter the
date from which you want the maintenance for this vehicle to begin
scheduling. The month, day, and year
are selected from the three drop-down boxes here.
o
Starting Usage: In this
field you enter the amount of usage miles which the vehicle has at the point
where it is entered into EZM Web.
o
Next Due Date: There are three options
here for choosing how EZM Web handles the case where the next due date for a
maintenance event falls on the weekend.
You can select either All Days valid, in which case maintenance
can be scheduled to be due on Saturdays and Sundays. If you choose Sat, Sun Excluded, any maintenance which is
scheduled to be due on a Saturday or Sunday will be scheduled to be due on the
immediately previous Friday. If you
choose Sun Only Excluded, then any maintenance which is scheduled to be
due on a Sunday will be scheduled to be due on the immediately previous
Saturday.
o
Service Profile: This is
where you choose the vehicle service profile which describes the maintenance
schedule for the vehicle which you are entering. You must choose from a list of vehicle service profiles that have
already been entered into EZM Web. (See
section 3.1.8 Vehicle Service Profiles for a
more detailed explanation on vehicle service profiles and how to enter service
profiles into EZM Web.)
o
Description: This field is
automatically filled in which the description of the maintenance profile you
choose.
o
Usage Units: This field is where you
enter the unit in which usage for this vehicle is measured, which is typically
“miles”.
o
Fuel Units: This field is where you
enter the unit in which fuel for this vehicle is measured, which is typically
“gallons”.
o
Min. Fuel Efficiency: Here you enter the minimum fuel efficiency.
Also, in
the Customer drop-down box, you choose the customer—if any—for whom you
are servicing this vehicle. (See sections 5.1 Viewing Open Customer
Requests and 5.2 Creating Work Orders from
Customer Requests for information on how to receive customer requests
for maintenance through EZM Web.)
Registration Details:
o
Registered To: In this field you enter
the name of the person or the business to whom the vehicle is registered.
o
License Plate: Here you enter the license
plate for the vehicle.
o
License Expiration Date: In this
field you enter the date on which the license is expiring. This field will have to be manually updated
whenever the license is renewed.
o
State Where Registered: Here
you enter the state in which the vehicle was registered.
o
Set Advance Notice Flag for Usage at: The
value you enter here is the amount of usage before the vehicle is due for
maintenance at which an alert is created (see section
3.7 Vehicle Maintenance Alerts for information on
vehicle maintenance alerts).
o
Driver: Here you enter the driver for this vehicle.
The Other Information section of the New Vehicle
Information window is where you enter information into custom fields whose
names you choose yourself:

Fig 3.110 – Custom fields on “New Vehicle Information”
screen
The field
names as seen above in figure 3.111 are arbitrary and are simply shown here for
demonstration purposes: “Lights”, “Speed”, “Interior”, etc. can be replaced
with whatever you want. To choose your
own custom field names, click on the Customize Captions button. This will open up a window into which you
input your custom field names:
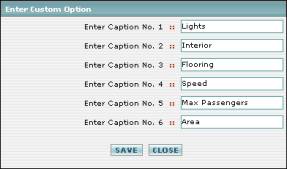
Fig 3.111 – Window where you enter custom field names
In this window, enter the names you want for the fields
and then click on the SAVE button to save your changes. If you just want to close the window without
making any changes, then click on the CLOSE button.
When you have finished entering all of the information for
the new vehicle you are entering, click on the SAVE button at the bottom
of the New Vehicle Information screen.
Also notice that, along with the SAVE button, there are also two
other buttons: REPRODUCE and CANCEL:
![]()
Fig 3.112 - “SAVE”, “REPRODUCE”, and “CANCEL” buttons
Click on CANCEL if you have changed your mind and
do not want to enter the new vehicle.
This button will take you back to the main vehicle control screen
without saving anything.
The REPRODUCE button will save the vehicle which
you have entered, and open up a new window where you can create another vehicle
which has all of the same properties and information as the one you just
saved. However, you must input a new
unique vehicle number and another VIN number for the new vehicle.
You may also change details of vehicles that have already
been entered into EZM Web. To do this,
first navigate to the main vehicle control screen (see section 3.2
Entering, Editing, and Deleting Your Vehicles for instructions on how to
reach this screen). Once there, locate
the vehicle you wish to edit in the list, and then look under the Edit
column and click on the small ![]() button that corresponds with the one you
wish to edit.
button that corresponds with the one you
wish to edit.
After clicking on the Edit button that corresponds
with the vehicle that you want to edit, you will be taken to the Edit
Vehicle Information screen:
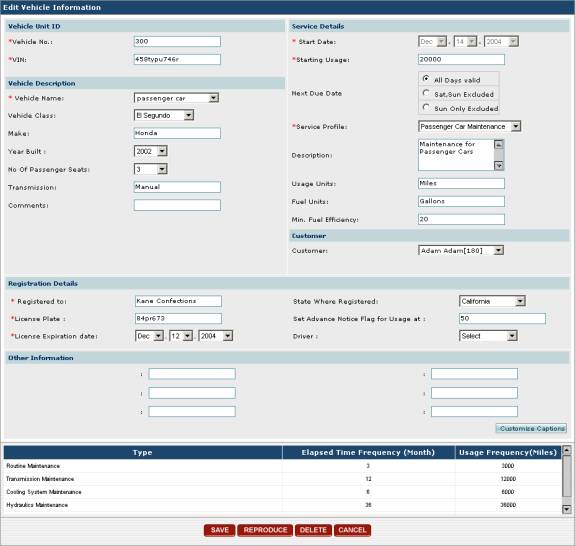
Fig 3.114 – “Edit Vehicle Information” screen
This screen is very similar to the one described in
section 3.2.2 Entering a New Vehicle where you
enter a new vehicle into EZM Web.
Unlike the screen at which you enter a new vehicle, however, the Edit
Vehicle Information screen will be filled with all of the information
previously entered about this vehicle.
See section 3.2.2 Entering a New
Vehicle for information on what the various data fields in this screen
are used for and how to enter data into them.
You can change the values for any of the data items in this screen.
Once you have made your desired changes, you can choose to
either save the changes to the vehicle, or, if you have changed your mind and
no longer want to make changes to it, cancel and return to the main vehicle
control screen. To save or cancel,
click on the SAVE or CANCEL buttons at the bottom of the screen
respectively:
![]()
Fig 3.115 – “SAVE”, “REPRODUCE”, “DELETE”, and “CANCEL”
buttons
The REPRODUCE button functions exactly as it does
as described in section 3.2.2 Entering a New Vehicle:
the REPRODUCE button will save the vehicle which you are editing, and
open up a new window where you can create another vehicle which has all of the
same properties and information as the one you just saved. However, you must input a new unique vehicle
number and another VIN number for the new vehicle.
The DELETE button deletes the vehicle. Clicking on the DELETE button brings
up the following window which asks you to confirm that you want to delete the
vehicle:

Fig 3.116 – Window confirming that you want to delete the
vehicle
Click on the OK button to confirm that you want to delete
the vehicle, or click on the CANCEL button if you’ve changed your mind
and do not want to delete the vehicle.
You may also delete vehicles from EZM Web when you no
longer want to use EZM Web to track them.
To do this, first navigate to the main vehicle control screen (see
section 3.2 Entering, Editing, and Deleting Your Vehicles
for instructions on how to reach this screen). Once there, locate the vehicle you wish to delete, and then look
under the Delete column and click on the small ![]() button that corresponds with the one you
wish to delete from EZM Web.
button that corresponds with the one you
wish to delete from EZM Web.
Once you click on the Delete button, a small window
will pop up on the screen prompting you to confirm that you want to delete the
vehicle from EZM Web:
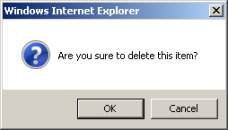
Fig 3.118 – Confirmation window for deleting a vehicle
from EZM Web
Click on the OK button to confirm that you want to
delete the vehicle, or click on the Cancel button if you have changed
your mind and do not want to delete it from EZM Web.
If you click on the OK button, you will be returned
to the main vehicle control screen, and the vehicle will be removed from the
list of vehicles.
Important Note: Vehicles for which work orders have been created cannot be
deleted from EZM Web. If you try to
delete a vehicle for which a work order has already been created, you will
receive the following error message:
