Contents:
- 3.3: Recording Vehicle Usage Logs
- 3.3.1: Entering a New Usage Log Entry
- 3.3.2: Editing the Notes for a Usage
Log Entry
- 3.3.3: Deleting a Usage Log Entry
- 3.3.4: Printing a Vehicle Usage Log
- 3.3.5: Importing Usage Logs for
Vehicles
3.3 Recording Vehicle Usage Logs
|
|
EZM Web also lets you track the usage miles for your
vehicles by keeping a series of usage log entries. In this section, the terms “mileage”, “usage”, and “usage miles”
are used interchangeably. To make a
usage log entry for a vehicle, first navigate to the main vehicle control
screen (see section 3.2 Entering,
Editing, and Deleting Your Vehicles for instructions on how to reach
this screen). Then locate the list of
vehicles:
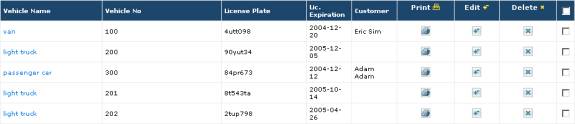
3_082: Fig 3.119 – List of vehicles entered into EZM Web
so far
Find the vehicle number of the vehicle for which you want
to make a usage log entry under the Vehicle No column. Once you have located that vehicle number,
look to the left along the same row until you encounter that vehicle’s vehicle
name, which is under the Vehicle Name column (the leftmost column in the
list) and highlighted in blue text.
Click on the vehicle name to go to the Vehicle Usage Log screen:
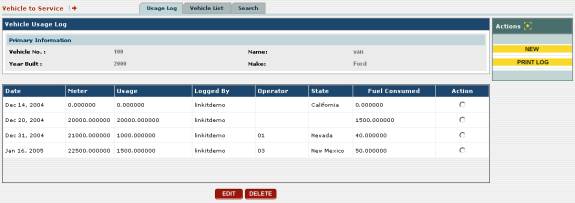
3_094: Fig 3.120 – List of vehicles entered into EZM Web
so far
Under Primary Information at this screen, you’ll
see the Vehicle No., the Name, the Year Built, and the Make
of the vehicle for which you are entering usage logs. Below the aforementioned vehicle information, you’ll also see the
list of usage log entries made so far:

3_095: Fig 3.121 – List of usage log entries
For each usage log entry listed,
the following information is shown:
o
The date of the usage: the
date on which the logged miles were driven is shown in the Date
column. This is not the date on which
the log entry was made, but rather when the miles were actually driven.
o
The cumulative usage at the time of the log entry: the
total amount of miles driven at the time of the log entry is shown in the Meter
column.
o
The amount of usage since the previous log entry: the
number of miles driven since the last log entry is shown in the Usage
column.
o
The user which made the log entry: the
username (the name used to log into EZM Web) of the user which made the log
entry is shown under the Logged By column.
o
The operator who was driving the vehicle: the
operator who was driving the vehicle during the time that the logged usage was
incurred is shown under the Operator column.
o
The State: the state in which the vehicle
was being driven when the logged usage was incurred is shown under the State
column.
o
Fuel Consumed: the amount of fuel
(typically measured in gallons) consumed for the logged usage/mileage is shown
under the Fuel Consumed column.
3.3.1 Entering a New Usage Log Entry
To enter a new usage log for a vehicle, first you must be
at the screen which lists the usage logs entered so far. (See the previous section for how to reach
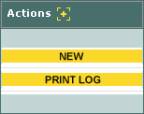
this screen). Then click on the yellow-colored
NEW button at the top right part of the screen:

3_096: Fig 3.122 – “NEW” button along with “PRINT LOG”
button
Clicking on the NEW button will bring you to the
following screen where you can enter the details of the new usage log entry:

3_097: Fig 3.123 – “NEW” button along with “PRINT LOG”
button
At this screen, you’ll see a number of data fields into
which you enter information about the new usage log entry:
o
The date on which the usage took place: This is
set by default to the current date, although you can also enter past dates to
record usage miles that hadn’t been recorded yet. Use the three drop-down boxes next to Date to select the
month, day, and year on which the usage occurred.
o
The current total mileage for the vehicle: The
total amount of mileage for the vehicle by the date you selected above is
entered into the Current Meter Reading field. The Usage field immediately below will also be
automatically filled in with the difference between the Last Meter Reading
(displayed right below the date) and what you enter into the Current Meter
Reading field. You must enter a
value in either the Current Meter Reading or Usage fields to save
the usage log.
o
The amount of mileage incurred since the last usage
log entry: The amount of mileage that has been incurred since the
last usage log entry is entered into the Usage field. If you choose to fill in this field instead
of the Current Meter Reading field, the Current Meter Reading
field will automatically be filled in with the sum of the Last Meter Reading
and what you enter into the Usage field.
o
The vehicle operator: Select
the vehicle operator or driver who was driving the vehicle when the usage miles
were incurred from the Operator drop-down box. Please note that only drivers you have entered into EZM Web so
far will be available to be selected from here. (See section 7.10 Managing Equipment Operators and Drivers
in EZM Web for information on how to enter equipment operators and
drivers into EZ Maintenance.)
o
The amount of fuel consumed: In the Fuel
Consumed field you enter the amount of fuel, in gallons, that were consumed
to drive the miles you are logging here.
o
The fuel efficiency of the vehicle: The Efficiency
data field is automatically filled in with the miles per gallon.
o
Any other notes pertaining to this log entry: Any other notes that you want to add to this
log entry can be entered into the Comments field.
Once you have entered the information above, then you can
save your new log entry, or, if you have changed your mind and no longer want
to enter a usage log entry, you can cancel entering the usage log entry. To either save or cancel, locate the SAVE
and CANCEL buttons below where you enter the information for the new
usage log entry:
3.3.2
Editing the Notes for a Usage Log Entry
Once a usage log entry has been
entered, you may edit the notes that were entered for it. To do this, locate the usage log entry whose
notes you want to edit at the vehicle usage log screen for the vehicle to which
that log entry belongs. (The vehicle
usage log screen is the one which shows all of the vehicle usage logs for a
particular vehicle. See earlier in this
section 3.3 for how to get to this screen.)
Then select the usage log entry: look to the right along the row in
which that entry is placed until you see a small circle in the Action
column. Click in that circle to select
the entry. A small dot will appear in
the circle to indicate that it has been selected:
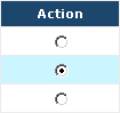
3_098: Fig 3.124 – A record has been selected
Once you have selected the usage
log entry for which you want to edit the notes, then find the EDIT
button below, which will be found along with the DELETE button:
![]()
3_099: Fig 3.125 – “EDIT” and “DELETE” buttons
Click on the EDIT button. This will open the following screen which shows you the details
for the usage log entry you selected:
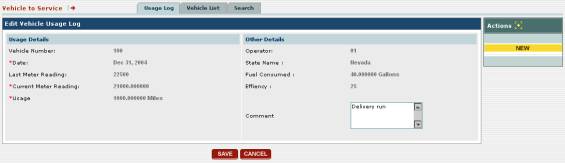
3_100: Fig 3.126 – Screen showing details for a selected
usage log entry
For information on what
each of these data entries means, see the immediately previous section on “Entering
a New Usage Log”.
To edit the notes for
the log entry you selected, simply click in the Notes field with your
cursor and type to make your desired changes.
When you have finished, click on the SAVE button below to save
your changes, or, if you have changed your mind and do not wish to make any
changes, click on the CANCEL button to discard any changes you’ve made
and simply return to the vehicle usage log screen:
![]()
3_101: Fig 3.127 – “SAVE” and “CANCEL” buttons
3.3.3 Deleting a Usage Log Entry
To delete a usage log entry for
a vehicle, locate the one you want to delete at the vehicle usage log screen
for that vehicle. (The vehicle usage
log screen is the one which shows all of the vehicle usage logs for a
particular vehicle. See earlier in this
section 3.3 for how to get to this screen.)
Then select the usage log entry: look to the right along the row in
which that entry is placed until you see a small circle in the Action
column. Click in that circle to select
the entry. A small dot will appear in
the circle to indicate that it has been selected:
3_098: Fig 3.128 – A record has been selected
Once you have selected the usage log entry which you want
to delete then find the DELETE button below, which will be found
alongside the EDIT button:
![]()
3_099: Fig 3.129 – “DELETE” button shown along with “EDIT”
button
Click on the DELETE button to delete the usage log
you have selected. Please note that you
can not delete the initial or final usage log entries. If you do, you will receive an error
message. (The initial log entry comes
from the value you enter in the Starting Usage field when creating a new
vehicle: see section 3.2.2 Entering a
New Vehicle.)
If you delete a usage log entry, the usage for the log
entry immediately following the one you deleted will be increased by the amount
of usage from the deleted entry. This
is done to reconcile the usage in the next entry with the total usage meter also
listed in that entry.
3.3.4
Printing a Vehicle Usage Log
To print the usage log for a
vehicle, first navigate to the vehicle usage log screen. (The vehicle usage log screen is the one
which shows all of the vehicle usage logs for a particular vehicle. See earlier in this section 3.3 for how to
get to this screen.) Then locate the
yellow-colored PRINT LOG button at the top-right part of the screen:
3_101: Fig 3.130 – “PRINT LOG” button for printing a
vehicle usage log
Once you click on the PRINT
LOG button, a small window will pop up in which you select a date range and
whether you want to separate the log entries by state:
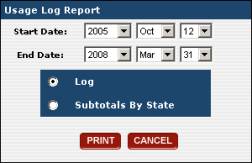
3_102: Fig 3.131 – Window for selecting a date range for
the usage log printout
The date range you select here will be used to determine
what usage log entries are included on the print out: only usage log entries
that are between or on the Start Date and End Date will be
included on the printout. If you want
to print the usage logs separated by the state in which they were entered, then
select Subtotals By State; otherwise just select Log to print the
standard usage log report:
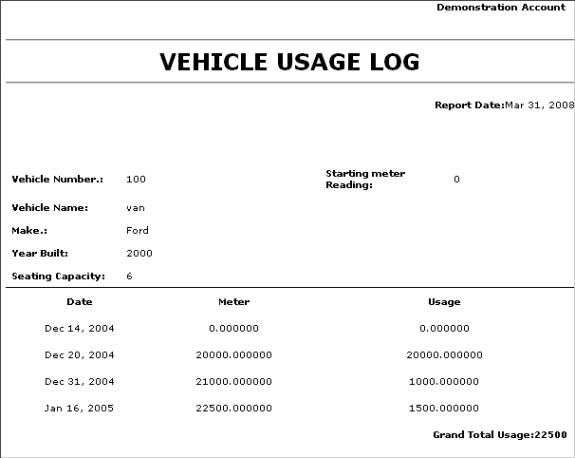
3_103: Fig 3.132 – Example of a vehicle usage log printout
3.3.5 Importing Vehicle Usage Logs
In addition to manually entering
mileage logs for vehicles as we just described in the previous section of this
manual, you can also import mileage logs for vehicles into EZM Web via an Excel®
spreadsheet. To do this, first
locate the Utilities and Lists drop-down menu on the left side of the
screen. Click on the small blue circle
containing a small right pointing arrow to expand the list to show the Import
Log option:
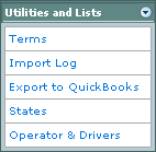
3_186: Fig 3.133 – “Utilities and Lists” drop-down box
showing “Import Log” option
Clicking on Import Log
will take you to the screen where you can import a spreadsheet containing the
usage logs:

3_187: Fig 3.134 – Screen for importing usage logs
Before you can import the usage logs, however, you must
make sure that they are in the correct format.
They must be imported as a special .CSV file provided by Link It
Software. This file can be edited using
Microsoft Excel®, just like a normal spreadsheet. To obtain the .CSV file with the correct
format, please contact tech support at support@pinacia.com.
Once you are ready to import
your data, click on the small circle called Vehicle to indicate that you
are importing vehicle usage logs, and not equipment usage logs. Then click on the Browse button. This will open up a window where you can
locate the .CSV file with your usage log information on your computer.
Once you have located the .CSV file, then click on the SAVE
button to import the usage logs into EZ Maintenance.