5.5 Sending an Invoice to a Customer
|
|
To send an invoice to a customer for completed work that
they requested, first go to the list of closed maintenance requests (see
section 5.4 Viewing the List of Closed Maintenance Requests for how
to do this). Then locate the request
for which you want to create an invoice in the list of closed requests:

Fig 5.5-1 – List of closed maintenance requests
Once you’ve located the request for which you want to
create an invoice, then look to the right until you find the small ![]() button. Clicking on that
button will take you to the work order which you created for the request. Find the GENERATE INVOICE button at
the bottom of the work order screen:
button. Clicking on that
button will take you to the work order which you created for the request. Find the GENERATE INVOICE button at
the bottom of the work order screen:
![]()
Fig 5.5-2 – “GENERATE INVOICE” button to generate an
invoice from a customer request
Once you click on the GENERATE INVOICE button, you
will be taken to the following screen where you create the invoice you are
sending to the customer:
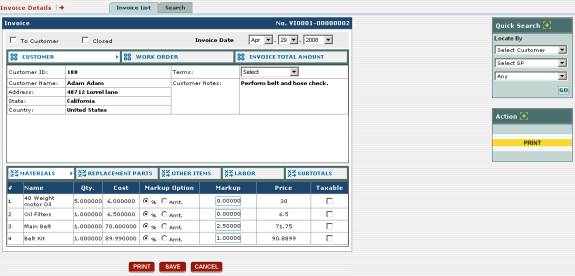
Fig 5.5-3 – Screen at which you create an invoice for a
customer
Note: if you
have made a change to the invoice here (such as a markup or the addition of a
tax) and it doesn’t seem to be reflecting on other parts of the invoice, try
clicking on the SAVE button to see if that corrects the problem.
This screen lets you view all of the details for the
invoice you are sending to the customer,
You can view the information for the customer to whom you are sending
the invoice, the details of the work order for the work the customer requested,
and the total costs included in the invoice using the CUSTOMER, WORK
ORDER, and INVOICE TOTAL AMOUNT options respectively:
![]()
Fig 5.5-4 – “CUSTOMER”, “WORK ORDER”, and “INVOICE TOTAL
AMOUNT” options
If CUSTOMER is selected, the details for the
customer to whom you are sending the invoice are shown:

Fig 5.5-5 – Details about the customer to whom you are
sending the invoice
You can select the terms of payment from the Terms
drop-down box above the Customer Notes.
If WORK ORDER is selected, the details of the work
order issued to perform the maintenance requested by the customer are shown:

Fig 5.5-6 – Details about the work order from which the
invoice is being created
If INVOICE TOTAL AMOUNT is selected, then the total
cost for the work plus materials is shown as well as any discounts, taxes, and
other charges added on:
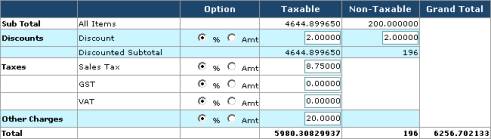
Fig 5.5-7 – Invoice totals
Here you can apply discounts to the cost of the invoice as
well as taxes and other charges. As you
can see, the discounts to the taxable items on the invoice and the non-taxable
ones are entered separately. You can
then add any sales tax, goods-and-services tax (GST), and value-added tax to
the total cost of the taxable items in the invoice (click in one of the small
circles called % or Amt. to add tax as a percentage or a
particular amount respectively). You
can also enter any other charges either as a percentage or a particular amount.
You can also view the materials, replacement parts, the
other ad hoc items used in the maintenance, as well as the labor costs and all
of the subtotals for these items using the MATERIALS, REPLACEMENT
PARTS, OTHER ITEMS, LABOR, and SUBTOTALS options
respectively:
![]()
Fig 5.5-8 – “MATERIALS”, “REPLACEMENT PARTS”, “OTHER
ITEMS”, “LABOR”, and “SUBTOTALS” options
Selecting the MATERIALS option shows you all of the
materials used in the work order:

Fig 5.5-9 – Materials in the invoice
For each material shown in the list the name of the
material is shown along with the quantity that was used and the cost per unit.
You can also mark up each material used in the maintenance
by either a percentage or a particular amount.
Under the Markup Option column, click in one of the small circles
called % or Amt. to markup by a percentage or a particular amount
respectively. Then, depending on what you
selected, type in the percentage or the amount in the appropriate box under the
Markup column. Notice that the
change will be reflected in the amount shown for that item in the Price
column. If you already entered a markup
when you entered the item into your inventory (see section 4.1.2 Inputting Your Inventory Items)
You can also choose which of these materials are taxable
by checking those items’ corresponding boxes under the Taxable
column. Checking the box for an item
means that the tax rate you entered under the Invoice Total Amount
section will be applied to the item.
Selecting the REPLACEMENT PARTS option shows you
all of the replacement parts used in the work order:

Fig 5.5-10 – Replacement parts in the invoice
As with the materials, here the name of the replacement
part is shown along with the quantity that was used and the cost per unit. You can also markup the cost of the part if
you’d like and mark it as a taxable item.
Selecting the OTHER ITEMS option shows you all of
the other ad hoc items on the work order:

Fig 5.5-11 – Other items in the invoice
Again, each item here is shown with the quantity and the
cost, and you can markup each item or mark it as taxable.
Selecting the LABOR option shows you the details
for the labor costs on the work order: the number of labor hours worked, the
total labor cost, and the markup on the labor:

Fig 5.5-12 – Other items in the invoice
As with previous costs on the invoice, you can also add a
markup to the labor and mark it as taxable.
Selecting the SUBTOTALS option shows you all of the
subtotals for the invoice, and breaks each part into the amounts that are
taxable and non-taxable:

Fig 5.5-13 – Subtotals for invoice
Now, to send the invoice to the customer for whom you
performed the work, click on the To Customer checkbox and save the
invoice by clicking on the SAVE button at the upper left. The invoice will now be viewable to the
customer when they log into EZM Web, and they can print the invoice out.