Contents:
- 4.1: Tracking and Controlling Your
Inventory
- 4.1.1: Viewing the List of Inventory
Items
- 4.1.2: Inputting Your Inventory Items
- 4.1.3: Editing Inventory Items
- 4.1.4: Deleting Inventory Items
- 4.1.5: Checking Inventory Items In or
Out
4.1 Tracking and Controlling Your Inventory
|
|
The main screen from which you track and control your
inventory is accessed by clicking on Inventory Item under the Inventory
drop-down list on the left side of the screen:
![]()
Fig. 4.1 – Inventory Item Link
After you click on Inventory Item, you will be
taken to the following screen, which we’ll call the “main inventory control
screen”:
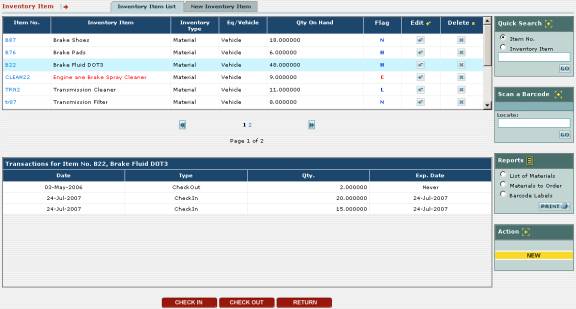
Fig. 4.2 – Main Inventory Control Screen
From this screen, you can accomplish the following
actions:
o
See a list of all inventory items and quickly determine
the quantity on hand
o
Input new inventory items into EZM Web
o
Edit inventory items currently in EZM Web
o
Delete inventory items from EZM Web
o
Check in, check out, or return replacement parts and/or
materials into inventory
4.1.1 Viewing the List of Inventory Items
At the top of the main inventory control screen (see the
previous section 4.1 Tracking and
Controlling Your Inventory for instructions on how to reach this
screen) you’ll see the list of inventory items:
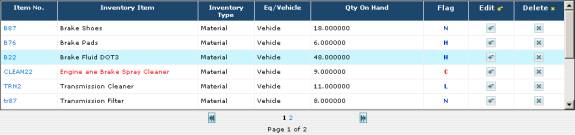
Fig. 4.3 – List of Inventory Items
The list of inventory items displays all of the inventory
items that you have entered into EZM Web so far.
Just by simply looking at the list of inventory items, you
can glean the following information for each inventory item you’ve entered:
o
The item number of the inventory item: the
item number for each inventory item is shown in the Item No.
column. The item number is an
arbitrarily chosen code that is used to uniquely identify each inventory item
in EZM Web. The item number for an
inventory item may or may not correspond with the internal tracking numbers
your company uses to track inventory.
o
The name of the inventory item: the
full name for each inventory item is shown in the Inventory Item
column. This is the name of the
inventory item in plain English and is meant to clearly tell the operator what
the inventory item is.
o
What type of inventory item it is: the
entries under the Inventory Type column say whether the inventory item
is a material (“material”) or a replacement part (“part”).
o
The quantity available on hand: the
quantity currently available on hand is shown in the Qty On Hand column.
o
Whether the quantity shown is low or high: in
addition, the entries shown under the Flag column let you know whether
the quantity shown in the Qty On Hand column are low or high for that
inventory item. For example, a quantity
of 5 may be high for an inventory item that you do not use often, but this may
be low for an inventory item that you use very frequently. You cannot tell, simply from the quantity,
whether an item is at a critically low quantity or not. With this in mind, the Flag column
immediately lets you know whether the item is at a critically low level (a
red-colored “C”), is low (“L”), is at a normal level (“N”)
or is at a high quantity (“H”).
If the number of inventory items which you have entered
exceeds the number that can be displayed on the screen at one time, the list of
inventory items will be split over multiple pages. Note that below the list of inventory items in Fig. 4.3 there are
page numbers shown along with two buttons: one to the right of the page numbers
and one to the left:
![]()
Fig. 4.4 – Close-up of Fig. 4.4 showing page numbers and
buttons
The page numbers shown between the two buttons list all of
the pages over which your list of inventory items is split. The current page being displayed is shown in
black, which is in this case (shown in Fig. 4.4) page 1. Other pages you can visit are shown in
blue. When you click on one of the blue
numbers, you are taken to that page.
The two buttons to the left and right are used to advance
you forward and backward one page.
The ![]() button
will move you backwards to the previous page, while the
button
will move you backwards to the previous page, while the ![]() button will advance you forward to the next page.
button will advance you forward to the next page.
You can adjust the number of inventory items that are
displayed on a single page by adjusting the program preferences. Please see section 7.3: Changing Preference Settings for
instructions on how to do this.
4.1.2 Inputting Your Inventory Items
To input a new inventory item into EZM Web, first you will
need to be at the main inventory control screen (see section 4.1 Tracking and Controlling Your Inventory
for instructions on how to reach this screen). There are two ways you can begin inputting your new inventory
item: you can either click on the New Inventory Item tab above the list
of inventory items or you can click on the yellow-colored NEW button at
the bottom-right corner of the screen:
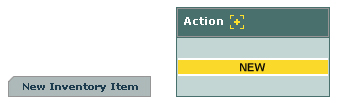
Fig. 4.5 – “New Inventory Tab” and “New” Button.
After clicking on either of
these, you will be taken to a screen where you enter the details about your new
inventory item:
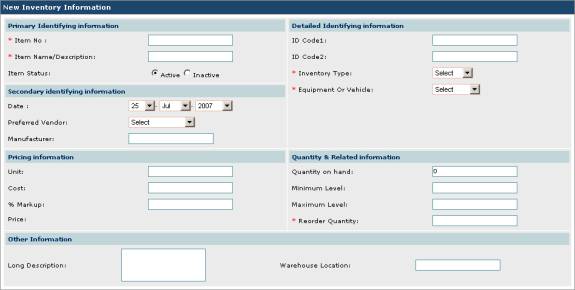
Fig. 4.6 – “New Inventory Information” Screen
As you can see in Fig 4.6, there are several fields on the
New Inventory Information screen in which you can enter data. Fields marked with a red asterisk are
required fields, which means that you cannot save the inventory item into EZM
Web until you have inputted information into these fields.
Also notice that all of the fields are organized into
groups such as Primary Identifying Information, Secondary Identifying
Information, Pricing Information, etc. We will proceed group by group and describe the purpose of each
data field.
Primary Identifying Information:
o
Item No.: In this field you enter a code
that uniquely identifies the inventory item.
This can be either a code from your existing cataloging system that your
company uses internally or a completely new code that you’ll use in EZM Web.
o
Item Name/Description: In this
field you enter the name of the inventory item. This name describes the inventory item in plain English and does
not need to be unique.
o
Item Status: Here you choose whether
or not the inventory item is Active or Inactive. If it is Active, then it is available
to be included in work orders and maintenance profiles. If it is set to Inactive, then it
cannot be used in work orders and maintenance profiles. Click in one of the two circles to make your
selection.
Secondary Identifying Information:
o
Date: This is the date for the
inventory item.
o
Preferred Vendor: From
this drop-down list you can select the vendor from whom you prefer to purchase
this inventory item. Keep in mind that
only vendors which you’ve already entered into EZM Web will appear as
selections here. (See section 4.2 Entering Your Vendors into EZM Web
for instructions on how to enter vendors into EZM Web.) Click on the arrow on the right side of the
box to expand the list of vendors and then click on the desired vendor.
o
Manufacturer: Here you enter the
manufacturer of the inventory item.
Pricing Information:
o
Unit: Here you enter the unit in
which quantities of this inventory item are measured. For example, if you are entering engine oil as an inventory item,
you might enter “quart” as the unit.
o
Cost: Here you enter the cost per
unit of this item which you charge customers when you do maintenance for
them. The amount you enter here will
automatically be included on invoices that you create in EZM Web. (See section 5.5
Sending an Invoice to a Customer for instructions on how to create
invoices.)
o
% Markup: Here you enter the markup on
the cost per unit of this item. The
amount you enter here will be automatically reflected on invoices that you
create in EZM Web, although you have the option of changing the markup or even
giving a discount when you create the invoice.
If you do not want to mark up the cost on the item, just enter “0” into
this field.
o
Price: This field is different than
the rest in that you cannot enter data directly into it. It simply displays the cost per unit of this
inventory item after the markup is added.
Detailed Identifying Information:
o
ID Code1: Here you enter an alternative
identifying code for your inventory item.
This code can be anything you want and has no bearing on how this
inventory item is identified in EZM Web except to give the operator an
alternative way of identifying this item.
o
ID Code2: This field serves the same
function as ID Code1 and provides another place you can put an
alternative identifying code.
o
Inventory Type: Here
you choose whether this inventory item is a material or a replacement
part. Click on the arrow on the right
side of the box to expand the list and choose either Material, Part,
or Other. Choosing Other
lets the item be used as either a material or a replacement part.
o
Equipment or Vehicle: Here you choose whether this inventory item
is used in equipment maintenance, in vehicle maintenance, or in both equipment
and vehicle maintenance. Click on the
arrow on the right side of the box to expand the list and click on either Equipment,
Vehicle, or Both.
Choosing Equipment allows this item to be chosen for use in
equipment maintenance profiles and work orders (see
sections 2.1.7 Equipment Maintenance
Profiles and 2.5.2 Creating
Equipment Work Orders for information on equipment maintenance profiles
and work orders respectively). Choosing
Vehicle allows this item to be chosen for use in vehicle service profiles
and work orders (see sections 3.1.8
Vehicle Service Profiles and 3.5.2 Creating Vehicle
Work Orders for information on vehicle service profiles and work orders
respectively). Choosing Both
allows this item to be chosen for use in both equipment and vehicle
maintenance.
Quantity
& Related Information:
o
Quantity on Hand: Here
you enter the quantity of this inventory item that you have on hand.
o
Minimum Level: This is the minimum
level you can have on hand of this item.
If the quantity goes below the level you specify here, the item will be
flagged with a red-colored “C” in the list of inventory items.
o
Maximum Level: This is the maximum
level you can have on hand of this item.
If the quantity goes above the level you specify here, the item will be
flagged with a blue-colored “H” in the list of inventory items.
o
Reorder Quantity: This is
the suggested increment in which new orders of this item are made.
Other
Information:
o
Long Description: Here you
enter a long description of the inventory item. You can type any information here that you feel will be useful
for the operator of the program to know, such as what the item is used for.
o
Warehouse Location: Here
you enter the location in which you have this item stored.
Once you have entered all of the information for your new
inventory item, you can choose to either save the item into EZM Web, or, if you
have changed your mind and no longer want to enter the item into the program,
cancel entering the item and return to the main inventory control screen. To save or cancel, click on the SAVE
or CANCEL buttons at the bottom of the screen respectively:
![]()
Fig. 4.7 – “Save” and “Cancel” button at the bottom of the
“New Inventory Information” screen.
If you choose to save the inventory item, you will be
returned to the main inventory control screen, and the new inventory item will
appear in the list of inventory items (see section 4.1.1 Viewing the List of Inventory Items
for information on how to view and browse through the list.)
4.1.3 Editing Inventory Items
You may also change details of inventory items that have
already been entered into EZM Web. To
do this, first navigate to the main inventory control screen (see section 4.1 Tracking and Controlling Your Inventory
for instructions on how to reach this screen). Once there, locate the inventory item you wish to edit in the
list, and then look under the Edit column and click on the small ![]() button that corresponds with the item you wish to edit.
button that corresponds with the item you wish to edit.
After clicking on the Edit button that corresponds
with the inventory item that you want to edit, you will be taken to the Edit
Inventory Information screen:
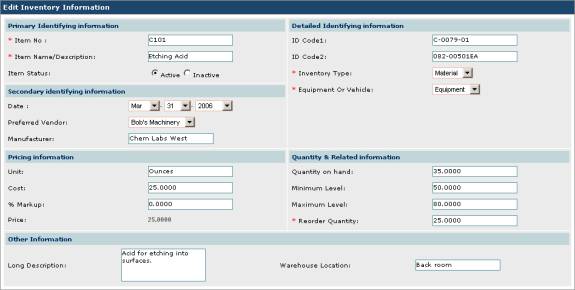
Fig. 4.8 – The “Edit Inventory Information” Screen
This screen is very similar to the one described in
section 4.1.2 Inputting Your Inventory
Items where you enter a new inventory item into the program. Unlike the screen at which you enter a new
inventory item, however, the Edit Inventory Information screen will be
filled with all of the information previously entered about this inventory
item.
See section 4.1.2
Inputting Your Inventory Items for information on what the various data
fields in this screen are used for and how to enter data into them. You can change the values for any of the
data items in this screen.
Once you have made your desired changes, you can choose to
either save the changes to the inventory item, or, if you have changed your
mind and no longer want to make changes to the item, cancel and return to the
main inventory control screen. To save
or cancel, click on the SAVE or CANCEL buttons at the bottom of
the screen respectively:
![]()
Fig. 4.9 – “Save” and “Cancel” button at the bottom of the
“Edit Inventory Information” screen.
4.1.4 Deleting Inventory Items
You may also delete inventory items from EZM Web when you
no longer want to use the program to track them. To do this, first navigate to the main inventory control screen
(see section 4.1 Tracking and
Controlling Your Inventory for instructions on how to reach this
screen). Once there, locate the
inventory item you wish to delete, and then look under the Delete column
and click on the small ![]() button that corresponds with the item you wish to delete from the
program.
button that corresponds with the item you wish to delete from the
program.
Once you click on the Delete button, a small window
will pop up on the screen prompting you to confirm that you want to delete the
inventory item from EZM Web:
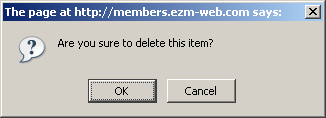
Fig 4.10 – Confirmation window for deleting an inventory
item from EZM Web
Click on the OK button to confirm that you want to
delete the item, or click on the Cancel button if you have changed your
mind and do not want to delete the item from the program.
If you click on the OK button, you will be returned
to the main inventory control screen, and the inventory item will be removed
from the list of inventory items.
4.1.5 Checking Inventory Items In and Out
You can also check inventory
items in and out at the main inventory control screen (see section 4.1 Tracking and Controlling Your Inventory
for instructions on how to reach this screen).
Before you can check a quantity
of an inventory item in or out, you must first select the inventory item. To do this, click on its item number in the
list of inventory items. The item
number of each inventory item is shown in blue text in the left-most column—called
Item No.—in the list of inventory items.
Once you have selected an
inventory item from the list, notice that the list of transactions (shown below
the list of inventory items) is updated with all of the transactions for the
inventory item you selected:
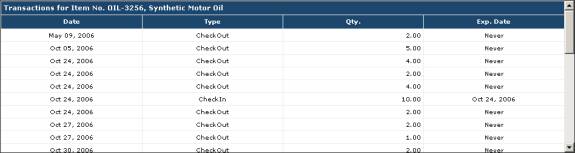
Fig. 4.11 – List of transactions for an inventory item
You can view all of the transactions by using the scroll
bar on the right side of the list.
Notice that below the list of transactions there are three buttons: CHECK
IN, CHECK OUT, and RETURN:
![]()
Fig. 4.12 – “CHECK IN”, “CHECK OUT”, and “RETURN” buttons
You can check in items by using the CHECK IN
button. Once you click on this button,
a form will open up at the bottom of the screen in which you can enter the
details of the new transaction:

Fig 4.13 – Form for checking in quantities of an inventory
item
In the Quantity field, type in the quantity which
you want to check in. Use the drop-down
boxes for the Transaction Date to select the date on which the
transaction took place; likewise, use the boxes for the Expiration Date
to select an expiration date for the inventory you are checking in.
When you have entered the details for this transaction,
click on the SAVE button to enter it, and it will appear in the list of
transactions. If you have changed your
mind and do not want to enter a new transaction, then click on the CANCEL
button.
You can check out inventory by using the CHECK OUT
button (as seen in Fig. 4.12). Clicking
on this button opens up a form at the bottom of the screen where you can enter
the details of the new transaction:

Fig 4.14 – Form for checking out quantities of an
inventory item
In the Quantity field,
type in the quantity which you want to check out. Use the drop-down boxes for the Transaction Date to select
the date on which the transaction took place.
When you have entered the
details for this transaction, click on the SAVE button to enter it, and
it will appear in the list of transactions.
If you have changed your mind and do not want to enter a new
transaction, then click on the CANCEL button.
You may also return unused
quantities of an inventory item using the RETURN button (as seen in Fig.
4.12). Clicking on this button opens up
a form at the bottom of the screen where you can enter the details of the new
transaction:

Fig 4.15 – Form for checking out quantities of an
inventory item
In the Quantity field, type in the quantity which
you want to check out. Use the
drop-down boxes for the Transaction Date to select the date on which the
transaction took place.
When you have entered the details for this transaction,
click on the SAVE button to enter it, and it will appear in the list of
transactions. If you have changed your
mind and do not want to enter a new transaction, then click on the CANCEL
button.