Contents:
- 4.2: Entering Your Vendors into EZM Web
- 4.2.1: Viewing the List of Vendors
- 4.2.2: Inputting Your Vendors
- 4.2.3: Editing Vendors
- 4.2.4: Deleting Vendors
- 4.2.5: Additional Vendor Contacts
- 4.2.6: Entering Vendor Ratings
- 4.2.7: Printing a List of All Vendors
- 4.2.8: Printing Vendor Mailing Labels
4.2 Entering Your Vendors into EZM Web
|
|
The main screen at which you enter vendors is accessed by
clicking on Setup Vendors under the Inventory drop-down list on
the left side of the screen (see the beginning of this chapter for how to
expand this list if you do not see the Setup Vendors option).
![]()
Fig. 4.16 – Setup Vendors Link
After you click on Setup Vendors, you will be taken
to the following screen, which we’ll call the “main vendor control screen”:
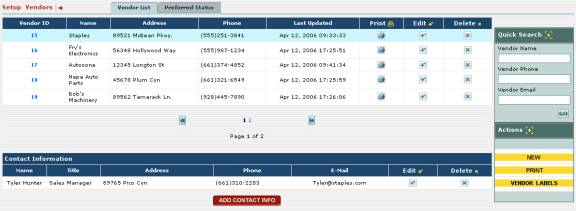
Fig. 4.17 – Main Vendor Control Screen
From this screen, you can accomplish the following
actions:
o
View a list of all vendors and see some basic information
about each
o
Input new vendors into EZM Web
o
Edit vendors currently in EZM Web
o
Delete vendors from EZM Web
o
Add, edit, and delete additional contacts for each vendor
o
Print a report listing all of the vendors currently in EZM
Web
o
Print mailing labels for your vendors
4.2.1 Viewing the List of Vendors
At the top of the main vendor control screen (see the
previous section 4.2 Entering Your
Vendors into EZM Web for instructions on how to reach this screen)
you’ll see the list of vendors:
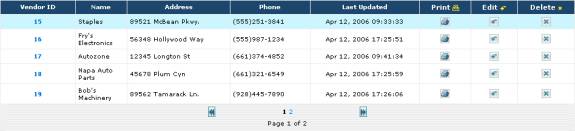
Fig. 4.18 – List of Vendors
The list of vendors displays all of the vendors whom you
have entered into EZM Web so far.
Just by simply looking at the list of vendors, you can
glean the following information for each vendor you’ve entered:
o
The vendor’s ID number: this is
a unique number that identifies the vendor in EZM Web. This number is automatically assigned to
each vendor when you enter them, and is shown in the Vendor ID column.
o
The vendor’s name: the name of the vendor,
either the name of the person or the company from whom you purchase materials
and/or replacement parts, is shown in the Name column.
o
The vendor’s address: the
street address at which the vendor is located is shown in the Address
column.
o
Phone: the vendor’s main phone number
is shown in the Phone column.
o
Last time vendor’s info was updated: the
date and time of the last time the vendor’s information was updated is shown in
the Last Updated column.
If the number of vendors which you have entered exceeds
the number that can be displayed on the screen at one time, the list of vendors
will be split over multiple pages. Note
that below the list of vendors in Fig. 4.18 there are page numbers shown along
with two buttons: one to the right of the page numbers and one to the left:
![]()
Fig. 4.19 – Close-up of Fig. 4.18 showing page numbers and
buttons
The page numbers shown between
the two buttons list all of the pages over which your list of inventory items
is split. The current page being
displayed is shown in black, which is in this case (shown in Fig. 4.19) page
1. Other pages you can visit are shown
in blue. When you click on one of the
blue numbers, you are taken to that page.
The two buttons to the left and
right are used to advance you forward and backward one page. The ![]() button will move you backwards to the previous page, while
the
button will move you backwards to the previous page, while
the ![]() button will advance you forward to the next page.
button will advance you forward to the next page.
You can adjust the number of
inventory items that are displayed on a single page by adjusting the program
preferences. Please see section 7.3: Changing Preference Settings for
instructions on how to do this.
4.2.2 Inputting Your Vendors
To input a new vendor into EZM
Web, first you will need to be at the main vendor control screen (see section 4.2 Entering Your Vendors into EZM Web for
instructions on how to reach this screen).
Then you will need to click on the yellow-colored NEW button at
the bottom right hand corner of the screen:

Fig. 4.20 – “NEW” button for adding vendors shown with
“PRINT” and “VENDOR LABELS” buttons
After clicking on the NEW button, you will be taken
to a screen where you enter the details about your new vendor:
Fig. 4.21 – “Vendor Information” screen for entering a new
vendor
As you can see in Fig 4.21,
there are several fields on the Vendor Information screen in which you
can enter data. Fields marked with a
red asterisk are required fields, which means that you cannot save the vendor
into EZM Web until you have inputted information into these fields. The purpose of each field is thus:
o
Vendor Name: In this field you enter
the name of the vendor, for example the name of the person or company.
o
Address: In this field you enter the
number and the street name where the vendor is located.
o
Terms: Here you choose what payment
terms you typically use with this vendor.
Click on the arrow on the right side of the box to expand the list and
then click on the desired payment terms.
Keep in mind that the payment terms that you wish to choose will not be
available here if you have not entered it into EZM Web yet. (See section 7.8
Entering Payment Terms for instructions on how to enter payment terms
into EZM Web.)
o
E-mail: In this field you enter the
vendor’s main email address.
o
Phone No.: In this field you enter
the vendor’s main phone number.
o
Notes: In this field you enter any notes about the vendor you wish.
o
City: In this field you enter the
city in which the vendor is located.
o
Zip: In this field you enter the
zip code in which the vendor is located.
o
State: Here you choose the state (or
province, depending on which country you are in) in which the vendor is located. Click on the arrow on the right side of the
box to expand the list and then click on the desired state. Keep in mind that the state or province you wish to choose will not be available here if
you have not entered it into EZM Web yet.
(See section 7.9 Entering the
List of States for instructions on how to enter states into EZM Web.)
o
Preferred Status: Here
you choose the rating which describes this vendor’s performance. Click on the arrow on the right side of the
box to expand the list and then click on the desired rating. Keep in mind that the rating you wish to
choose will not be available here if you have not entered it into EZM Web yet. (See section 4.2.2 Entering Vendor Ratings for
instructions on how to enter vendor ratings into EZM Web.)
o
Country: Here you choose the country in
which the vendor is located. Click on
the arrow on the right side of the box to expand the list and then click on the
desired country.
o
Fax No.: In this field you enter the
vendor’s fax number.
Once you have entered all of the
information for your new vendor, you can choose to either save the vendor into
EZM Web, or, if you have changed your mind and no longer want to enter the
vendor into the program, cancel
entering the item and return to the main inventory control screen. To save or cancel, click on the SAVE
or CANCEL buttons at the bottom of the screen respectively:
![]()
Fig. 4.22 – “Save” and “Cancel”
button at the bottom of the “Vendor Information” screen.
If you choose to save the
vendor, you will be returned to the main vendor control screen, and the new
vendor will appear in the list of vendors (see section 4.2.1 Viewing the List of Vendors for
information on how to view and browse through the list.)
4.2.3 Editing Vendors
You may also change details of
vendors who have already been entered into EZM Web. To do this, first navigate to the main vendor control screen (see
section 4.2 Entering Your Vendors in EZM
Web for instructions on how to reach this screen). Once there, locate the vendor you wish to
edit in the list, and then look under the Edit column and click on the
small ![]() button that corresponds with the vendor you wish to edit.
button that corresponds with the vendor you wish to edit.
After clicking on the Edit
button that corresponds with the vendor that you want to edit, you will be
taken to the Vendor Information screen:
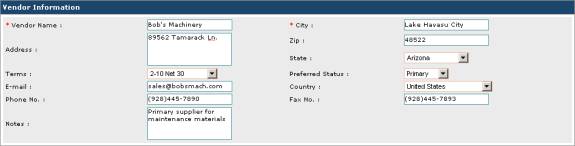
Fig. 4.23 – The “Vendor Information” screen where you edit
vendor information
This screen is very similar to the one described in
section 4.2.2 Inputting Your Vendors
where you enter a new vendor into the program. Unlike the screen at which you enter a new vendor, however, the Vendor
Information screen here will be filled with all of the information
previously entered about this vendor.
See section 4.2.2 Inputting Your Vendors for
information on what the various data fields in this screen are used for and how
to enter data into them. You can change
the values for any of the data items in this screen.
Notice that there are three
buttons at the bottom of the Vendor Information screen: SAVE, CANCEL,
and MAILING LABELS:
![]()
Fig. 4.24 – “SAVE”, “CANCEL”, and “MAILING LABELS” buttons
The MAILING LABELS button is used to print mailing
labels for the vendor. Printing mailing
labels for vendors is discussed in detail in section 4.2.8 Printing Vendor Mailing Labels.
Once you have made your desired changes to the information
for the vendor, you can choose to either save the changes you made to the
vendor, or, if you have changed your mind and no longer want to make changes to
the vendor, cancel and return to the main vendor control screen. To save or cancel, click on the SAVE
or CANCEL buttons respectively (as shown in Fig. 4.24).
4.2.4 Deleting Vendors
You may also delete vendors from EZM Web when, for
example, you are no longer working with them or if they were inputted accidentally. To do this, first navigate to the main
vendor control screen (see section 4.2
Entering Your Vendors into EZM Web for instructions on how to reach
this screen). Once there, locate the
vendor you wish to delete, and then look under the Delete column and
click on the small ![]() button that corresponds with the vendor you wish to delete from
the program.
button that corresponds with the vendor you wish to delete from
the program.
Once you click on the Delete button, a small window
will pop up on the screen prompting you to confirm that you want to delete the
vendor from EZM Web:
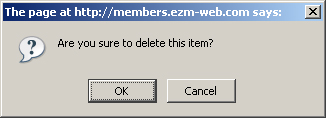
Fig 4.25 – Confirmation window for deleting a vendor from
EZM Web
Click on the OK button to confirm that you want to
delete the vendor, or click on the Cancel button if you have changed
your mind and do not want to delete the vendor from the program.
If you click on the OK button, you will be returned
to the main vendor control screen, and the vendor will be removed from the list
of vendors.
4.2.5 Additional Vendor Contacts
At the main vendor control
screen (see section 4.2 Entering Your
Vendors into EZM Web for instructions on how to reach this screen), you
can view a list of additional contacts for each vendor you have entered into
EZM Web.
To see a list of additional contacts
for a particular vendor, first click on that vendor’s ID number under the Vendor
ID column in the list of vendors.
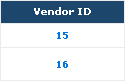
Fig. 4.26 – Portion of “Vendor ID” column showing vendor
ID numbers.
Once you click on one of the vendor ID numbers, a list of
additional contacts will appear below the list of vendors that displays all of
the additional contacts for the vendor whose ID number you clicked on.

Fig. 4.27 – List of additional contacts for a vendor
You can add additional contacts to this list, edit the
information for existing contacts, and delete contacts. To add a contact to the list, use the ADD
CONTACT INFO button right below the list of contacts:
![]()
Fig. 4.28 – “ADD CONTACT INFO” button used for adding
additional vendor contacts
When you click on the ADD CONTACT INFO button, a
form will open below the list of additional contacts into which you enter the
details for the new contact you are adding:
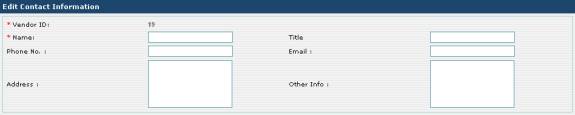
Fig. 4.29 – Form for entering information about new
additional contact
As you can see in Fig 4.36, there are several fields in
this form in which you can enter data.
The Vendor ID field is automatically filled with the ID number of
the vendor for which you are entering the additional contact. The Name field is marked with a red
asterisk which means that you cannot save the additional contact until you have
filled in this field. The purpose of
each field is thus:
o
Name: here you enter the name of the
person you are listing as an additional contact.
o
Phone No.: here you enter the phone
number of the contact.
o
Address: here you enter the address of
the contact.
o
Title: here you enter the job title
of the contact.
o
Email: here you enter the contact’s
email address.
o
Other Info: here you can enter any
additional notes you want to record about this contact.
Once you have entered all of the information for the new
contact, you can choose to either save the contact, or cancel if you have
changed your mind and no longer want to enter the contact. To save or cancel, click on the SAVE
or CANCEL buttons respectively below the form:
![]()
Fig. 4.30 – “SAVE” and “CANCEL” buttons
Clicking on SAVE closes the contact form and adds
the new contact to the list. Clicking
on CANCEL simply closes the form without adding a new contact to the
list.
As stated previously in this section, you can also edit
existing additional contacts. To do
this, locate the contact you wish to edit in the list of contacts, and then
look under the Edit column and click on the small ![]() button that corresponds with the contact you wish to edit. This will open up a form below the list of
contacts which is similar to the one where you enter a new contact, except for
the fact that all of the current information for that contact is already filled
in:
button that corresponds with the contact you wish to edit. This will open up a form below the list of
contacts which is similar to the one where you enter a new contact, except for
the fact that all of the current information for that contact is already filled
in:

Fig. 4.31 – Form for editing a vendor contact
You can change the values for
any of the data items in this form.
Once you have made your desired changes, you can choose to either save
the changes to contact, or, cancel if you have changed your mind and no longer
want to make changes to the contact. To
save or cancel, click on the SAVE or CANCEL buttons respectively
below the form (see Fig 4.30 above).
Clicking on SAVE closes
the contact form and saves the changes you made. Clicking on CANCEL simply closes the form without making
any changes to the contact.
You can also delete additional contacts. To do this, locate the contact you wish to
delete in the list of contacts, and then look under the Delete column
and click on the small ![]() button that corresponds with the contact you wish to delete.
button that corresponds with the contact you wish to delete.
Once you click on the Delete button, a small window
will pop up on the screen prompting you to confirm that you want to delete the
contact:
Fig 4.32 – Confirmation window for deleting an additional
contact for a vendor
Click on the OK button to
confirm that you want to delete the contact, or click on the Cancel
button if you have changed your mind and do not want to delete the contact.
4.2.6 Entering Vendor Ratings
You rate you vendors with
ratings that you enter into EZM Web.
These ratings are chosen from a drop-down box when you enter a new
vendor into EZM Web; however, you can only choose from ratings that you have
already entered. To go to the section
of EZM Web where you enter vendor ratings, first go to the main vendor control
screen. (See section 4.2 Entering Your Vendors into EZM Web for
instructions on how to reach this screen.)
Once you are at the main vendor
control screen, find the Preferred Status tab above the list of vendors:
![]()
Fig 4.33 – “Preferred Status” tab
Clicking on the Preferred
Status tab takes you to the following screen where you can enter the vendor
ratings:
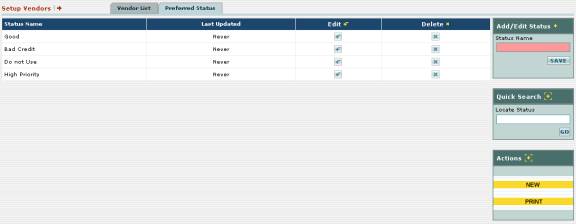
Fig 4.34 – Screen where you enter new vendor ratings into
EZM Web
To enter a new vendor rating, first locate the
yellow-colored NEW button at the right part of the screen:
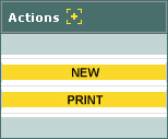
Fig 4.35 – “NEW” button for entering new vendor ratings
into EZM Web
Click on the NEW button
to enter a new vendor rating. Notice
that the Add / Edit Status box in the upper right part of the screen
contains a box called Status Name:

Fig 4.36 – “Add/Edit Status” box; entering new vendor
rating
Next, click in the Status Name box and type the new
vendor rating. Then click on the SAVE
button. The new rating which you typed
will appear in the list.
To edit an existing rating, first locate the rating in the
list and then look to the right of it until you encounter a ![]() button under the Edit column:
button under the Edit column:

Fig 4.37 – “Edit” column with edit buttons
Click on the ![]() button. Notice that the Add
/ Edit Status box contains a box called Status Name that fills in
with the vendor rating you want to edit (which in the case of fig. 4.38 is “Good”):
button. Notice that the Add
/ Edit Status box contains a box called Status Name that fills in
with the vendor rating you want to edit (which in the case of fig. 4.38 is “Good”):

Fig 4.38 – “Add/Edit Status” box; editing a vendor rating
Click in the Status Name box and type to make the
desired changes to the vendor rating.
Then click on the SAVE button.
The updated rating will be shown in the list.
To delete an existing vendor rating, first locate the
rating in the list and then look to the right of it until you encounter a ![]() button under the Delete column:
button under the Delete column:

Fig 4.39 – “Delete” column with delete buttons
Click on the ![]() button. The vendor rating
to the left of the delete button you clicked will be deleted from the list.
button. The vendor rating
to the left of the delete button you clicked will be deleted from the list.
To print a list of all the
vendor ratings entered into EZM Web so far, first locate the yellow-colored PRINT
button at the right part of the screen:
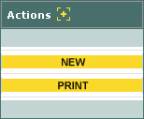
Fig 4.40 – “PRINT” button
Clicking on the PRINT button will print the
following report:
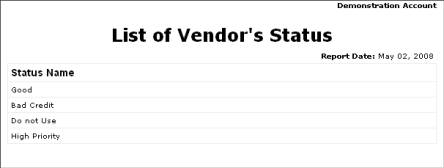
Fig 4.41 – List of vendor ratings
4.2.7 Printing a List of All Vendors
To print a list of all the vendors you’ve entered into EZM
Web so far, first go to the main vendor control screen. (See section 4.2
Entering Your Vendors into EZM Web for instructions on how to reach
this screen.) Then locate the
yellow-colored PRINT button at the lower-right part of the screen:
Fig. 4.42 – “PRINT” button shown along with “NEW” and
“VENDOR LABELS” buttons.
Clicking on the PRINT button will print the
following report which shows you all of the vendors you’ve entered into EZM
Web:
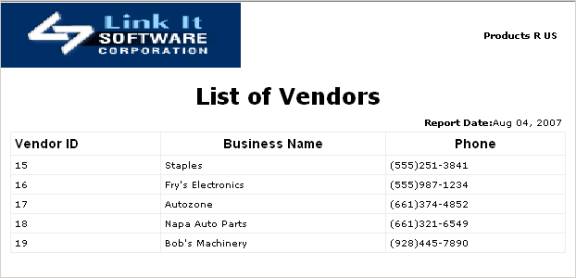
Fig. 4.43 – Report listing vendors in EZM Web
From looking at Fig. 4.43, you can see that the report
shows, for each vendor, their ID number, their business name, and their main
phone number.
4.2.8 Printing Vendor Mailing Labels
You can print mailing labels with your vendors’ address on
them in three different ways:
o
You can print a sheet or sheets containing mailing labels
for all of your vendors.
o
You can print a sheet with multiple mailing labels for the
same vendor.
o
You can print a single mailing label for a vendor.
To print a sheet (or sheets) containing mailing labels for
all of your vendors, first go to the main vendor control screen. (See section 4.2
Entering Your Vendors into EZM Web for instructions on how to reach
this screen.) Then click on the
yellow-colored VENDOR LABELS button at the lower right-hand corner of
the screen:
Fig. 4.44 – “VENDOR LABELS” button shown along with “NEW”
and “PRINT” buttons.
Clicking on the VENDOR LABELS button will print the
following sheet which has a mailing label for each vendor you’ve entered into
EZM Web so far:
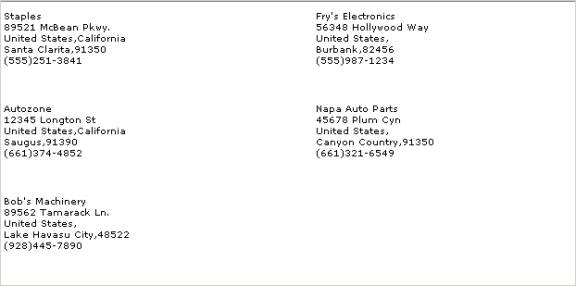
Fig. 4.45 – Example of a sheet of vendor mailing labels
printed from EZM Web
To print a sheet with multiple
mailing labels for the same vendor or a single mailing label for a vendor,
locate the vendor for which you want to print the label or labels in the list
of vendors, and then look under the Edit column and click on the
small ![]() button that corresponds with that vendor. This will take you to another screen (see
section 4.2.3 Editing Vendors
for the purpose of this screen) with a MAILING LABELS button:
button that corresponds with that vendor. This will take you to another screen (see
section 4.2.3 Editing Vendors
for the purpose of this screen) with a MAILING LABELS button:
![]()
Fig. 4.46 – “MAILING LABELS” button
Click on the MAILING LABELS button. This will pop up a small window with two
choices, Single Label or Multiple Labels:

Fig. 4.47 – Window which lets you choose between printing
a single label or multiple labels
To select either Single Label or Multiple Labels,
click on the small circle next to each.
Clicking on Multiple Labels will print out a sheet with multiple
mailing labels (as many as will fit on the sheet) for the vendor:
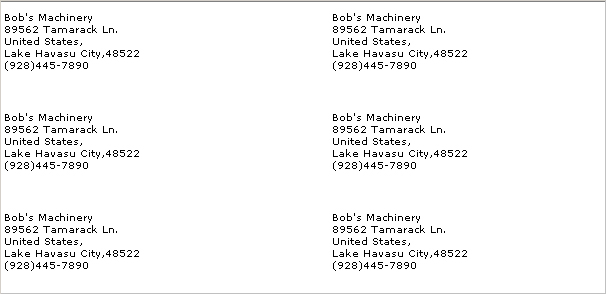
Fig. 4.48 – A truncated example of a sheet with multiple
mailing labels on it for the same vendor
Alternatively, clicking on the circle next to Single
Label will print a sheet with a single mailing label in the upper left-hand
corner.